Spring has sprung, and Easter is just around the corner! Are you looking for a simple yet stunning dessert that will impress your guests and perfectly complement your Easter celebrations? Look no further than this delightful Easter Jell-O Pie. This no-bake recipe is incredibly easy to make, requiring minimal effort and ingredients, yet delivers a vibrant and refreshing treat that’s both visually appealing and deliciously satisfying. The combination of creamy Jell-O, cool whipped topping, and festive Easter candies creates a dessert that’s perfect for both kids and adults. This recipe is adaptable to your favorite Jell-O flavors and allows for creative customization, making it a fun project for the whole family. Get ready to add a pop of color and flavor to your Easter table!
Recipe: A Brief Description
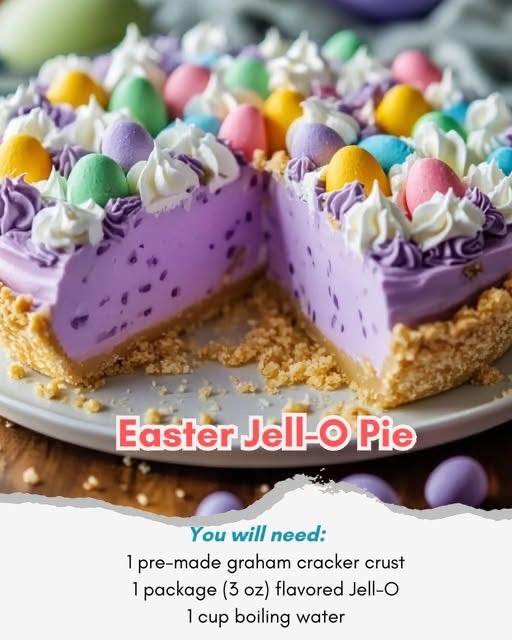
This Easter Jell-O Pie is a delightful no-bake dessert featuring a creamy Jell-O filling in a classic graham cracker crust. The vibrant Jell-O layer is made even more luscious with the addition of sweetened condensed milk and whipped topping. The finished pie is then adorned with whipped cream and colorful Easter-themed candies, creating a festive and irresistible treat perfect for your Easter celebrations.
Ingredients
For the Crust:
1 pre-made 9-inch graham cracker crust (or your favorite homemade graham cracker crust recipe)
For the Jell-O Layer:
1 (3-ounce) package flavored Jell-O (lime, strawberry, raspberry, or your preferred Easter color)
1 cup boiling water
1/2 cup cold water
1/2 cup sweetened condensed milk
1/2 cup whipped topping (such as Cool Whip, thawed)
For the Topping:
Whipped cream (or additional whipped topping)
Easter-themed candies (jelly beans, chocolate eggs, pastel sprinkles, mini marshmallows, etc.)
Directions/Instructions
1. Prepare the Crust: If using a homemade crust, prepare it according to your recipe and bake as directed. Allow it to cool completely before proceeding. If using a pre-made crust, simply remove it from its packaging and set it aside.
2. Dissolve the Jell-O: In a medium-sized bowl, carefully pour the boiling water over the Jell-O powder. Stir constantly until the Jell-O is completely dissolved and there are no lumps remaining. This step is crucial for a smooth and even texture.
3. Cool and Combine: Add the 1/2 cup of cold water to the dissolved Jell-O mixture. Stir gently to combine. Allow the mixture to cool slightly, about 10-15 minutes. This cooling period helps prevent the whipped topping from melting when it’s added.
4. Incorporate Sweetness and Creaminess: Stir in the sweetened condensed milk until it’s thoroughly incorporated and the mixture is smooth. The sweetened condensed milk adds a wonderful richness and sweetness to the Jell-O layer.
5. Fold in Whipped Topping: Gently fold in the thawed whipped topping until it’s evenly distributed throughout the Jell-O mixture. Be careful not to overmix, as this can deflate the whipped topping and create a less airy texture.
6. Assemble the Pie: Pour the Jell-O mixture into the prepared graham cracker crust. Spread it evenly to ensure an even layer.
7. Chill and Set: Refrigerate the pie for at least 3 hours, or until the Jell-O layer is completely set and firm. The longer it chills, the firmer the Jell-O will become.
8. Decorate and Serve: Once the Jell-O is set, top the pie with whipped cream. Garnish generously with your chosen Easter candies and sprinkles. Slice and serve immediately, or keep chilled until ready to serve.
FAQ
Q: Can I use a different type of crust?
A: Absolutely! While a graham cracker crust is classic and pairs well with the Jell-O filling, you can experiment with other crusts, such as chocolate wafer crusts, Oreo crusts, or even a shortbread crust.
Q: Can I use different flavors of Jell-O?
A: Yes! This recipe is highly adaptable. Feel free to experiment with different Jell-O flavors to match your Easter color scheme or personal preferences. Consider using a combination of flavors for a more complex flavor profile.
Q: How long can I store the pie?
A: It’s best to store the pie in the refrigerator for up to 3-4 days after it’s been made. Keep it covered to prevent it from absorbing unwanted odors.
Q: Can I add other ingredients to the Jell-O layer?
A: Yes! For added texture and flavor, consider adding mini marshmallows, fresh fruit (berries work particularly well), or even chopped nuts to the Jell-O mixture before pouring it into the crust.
Q: What if my Jell-O doesn’t set properly?
A: Ensure you’ve used the correct amount of boiling water to dissolve the Jell-O powder completely. Also, make sure the pie is chilled for a sufficient amount of time to allow the Jell-O to set properly. If it still doesn’t set, there may be an issue with the Jell-O itself.
Conclusion
This Easter Jell-O Pie is the perfect combination of simplicity, elegance, and festive fun. With its vibrant colors, refreshing taste, and minimal preparation time, it’s a guaranteed crowd-pleaser for your Easter gathering. So, gather your ingredients, put on your apron, and create a delightful dessert that will leave your guests wanting more. Happy Easter! Remember to adapt the recipe to your liking and enjoy the creative process of making this beautiful and delicious pie. Don’t be afraid to experiment with different flavors and decorations to make it your own unique Easter masterpiece.