1. Introduction
The aroma of freshly baked bread, its crust crackling with a satisfying snap, is a culinary experience that transcends cultures. Few breads capture this sensory delight quite like the classic French baguette. While the traditional, long baguette might seem daunting for the home baker, these miniature versions offer a manageable and equally rewarding project. This recipe delivers authentically crusty mini baguettes, perfect for dipping in soup, alongside cheese and charcuterie, or simply enjoyed on their own. Get ready to transport your taste buds to a Parisian boulangerie, all from the comfort of your own kitchen!
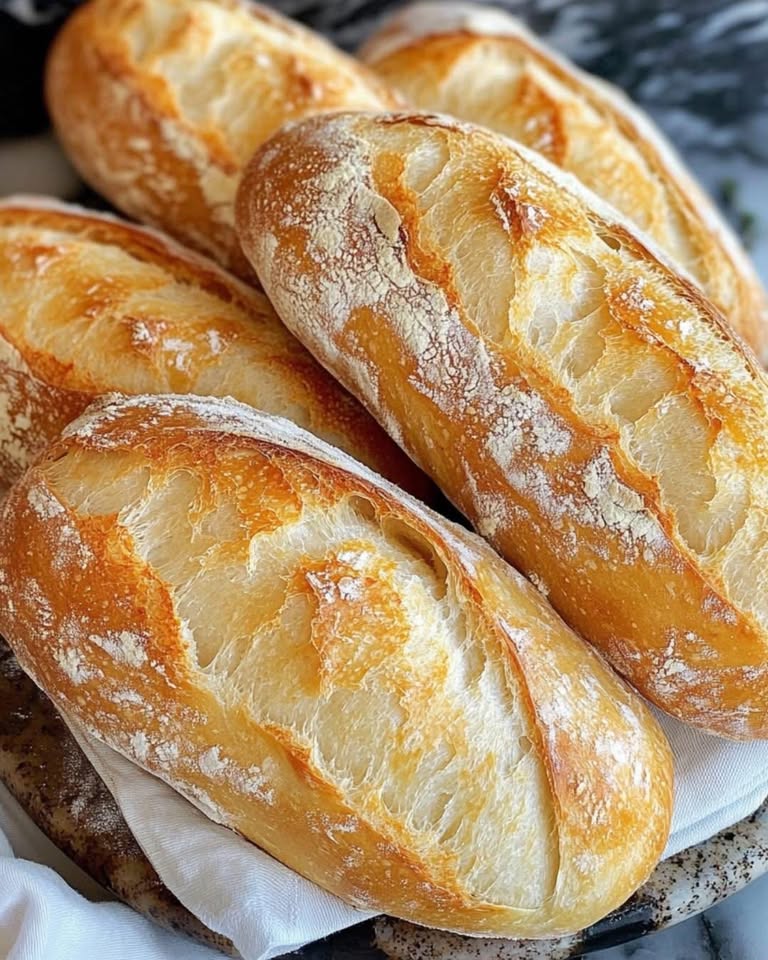
2. Recipe: A Brief Description
This recipe guides you through making four delectable mini baguettes with a beautifully crisp crust and soft, airy interior. The process involves a simple yeast activation, dough kneading, a crucial proofing period, and finally, a high-temperature bake for that signature crust. Even novice bakers will find this recipe approachable and satisfying, resulting in bread that tastes far superior to anything store-bought.
3. Ingredients: A Detailed List
Before you begin, gather the following ingredients. Accuracy in measurements is crucial for optimal results:
* 2 1/4 cups (280g) all-purpose flour: Using a kitchen scale for accurate flour measurement is highly recommended. All-purpose flour is readily available and works perfectly for this recipe.
* 1 teaspoon (5g) salt: Salt enhances the flavor of the bread and helps control yeast activity.
* 1 teaspoon (4g) sugar: A small amount of sugar provides food for the yeast, encouraging a robust rise.
* 1 packet (2 1/4 teaspoons or 7g) active dry yeast: Ensure your yeast is fresh for optimal leavening. Check the expiration date on the packet.
* 3/4 cup (177ml) warm water: The water should be comfortably warm to the touch, around 105-115°F (40-46°C). Too hot will kill the yeast, and too cold will hinder activation.
* 1 tablespoon (15ml) olive oil: Olive oil adds flavor and richness to the dough, contributing to a softer crumb.
* 1 large egg (optional): An egg wash, brushed on before baking, creates a glossy, golden-brown crust. This step is completely optional, but highly recommended for visual appeal and a slightly richer flavor.
4. Directions/Instructions: Step-by-Step Preparation
1. Activate the Yeast: In a large bowl, combine the warm water, sugar, and yeast. Gently stir to combine and let it sit for 5-10 minutes until the mixture becomes frothy. This indicates the yeast is active and ready to work its magic.
2. Combine Dry Ingredients: In a separate bowl, whisk together the flour and salt. This ensures even distribution of the salt throughout the dough.
3. Mix the Dough: Add the activated yeast mixture and olive oil to the flour mixture. Stir with a wooden spoon or spatula until a shaggy dough forms.
4. Knead the Dough: Turn the dough out onto a lightly floured surface and knead for 5-7 minutes. Kneading develops the gluten in the flour, resulting in a more elastic and chewy texture. The dough should become smooth and slightly elastic.
5. First Rise (Bulk Fermentation): Lightly oil a large bowl. Place the kneaded dough in the bowl, turning to coat it with oil. Cover the bowl with plastic wrap or a clean kitchen towel and let it rise in a warm place for about 1 hour, or until doubled in size.
6. Shape the Baguettes: Once the dough has doubled, gently punch it down to release the air. Divide the dough into four equal pieces. Shape each piece into a small, oblong baguette, about 6-8 inches long. You can gently taper the ends for a more authentic look.
7. Second Rise (Proofing): Place the shaped baguettes on a baking sheet lined with parchment paper. Allow them to rest for 20 minutes. This final proof allows the baguettes to relax and develop their final shape and volume.
8. Egg Wash (Optional): If using, whisk the egg lightly and brush it over the tops of the baguettes.
9. Bake: Preheat your oven to 475°F (245°C). Bake the baguettes for 20-25 minutes, or until they are golden brown and sound hollow when tapped on the bottom.
10. Cooling: Remove the baguettes from the oven and let them cool completely on a wire rack before slicing and serving. This allows the crust to crisp up and the interior to set.
5. FAQ: Frequently Asked Questions
Q: What if my yeast doesn’t activate?
A: Ensure your yeast is fresh and that the water is the correct temperature. If it still doesn’t activate, try a new packet of yeast.
Q: Can I use a different type of flour?
A: Bread flour will produce a chewier loaf, while using all-purpose flour will yield a softer crumb.
Q: How can I tell if my baguettes are done baking?
A: They should be golden brown and sound hollow when tapped on the bottom. Use an instant-read thermometer for an internal temperature of 200-210°F (93-99°C).
Q: Can I freeze these baguettes?
A: Yes, once completely cooled, you can freeze them in a freezer-safe bag for up to 3 months. Thaw overnight in the refrigerator and reheat in a 350°F (175°C) oven for a few minutes to crisp up the crust.
6. Conclusion
Making your own crusty mini baguettes is a rewarding experience that elevates your baking skills and provides incredibly delicious results. The process is simpler than you might imagine, and the aroma and taste of freshly baked bread are unmatched. So gather your ingredients, follow these steps, and savor the taste of France in your kitchen! Enjoy!